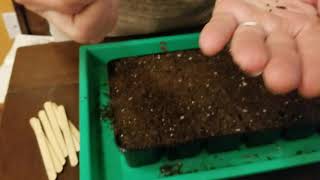
Hi, Sam here. I’m going to actually walk you through this very simple step-by-step process of starting your seeds in this really cheap and effective manner. So like I told you last time, I got these packets from my local grocery store and I had four packs of 24 cells. They were really, really inexpensive. Remember these were super easy. They’re super cheap. And they will last me a couple of years’ time. So we are going to plant our leafy greens, just a couple of varieties to get them started so that when I am ready to put them outside, I will have them ready to rock and roll.
What You’ll Need
Potting Soil
Yes, many people mix their own. ME? I don’t have time for that!
Trays – as described in previous video
Large tray or something to put under your work area for easy clean-up
Spray bottle of water
Seeds
Craft/popsicle sticks or other markers you’re using
Marker
Process:
Add potting soil to your seed tray
Dampen with water (I didn’t have it handy in this video)
The Brussel Sprout seeds I’m planting are very tiny, VERY tiny, so I’m putting 3 in each cell
Cover lightly
Label the sticks with seed name, brand, etc
Use the sticks (or any fancy tags you’re using) to label your cells so that you remember what they are
Lightly spritz again with water
Key Tip: Check your seeds every day so they don’t dry out, which will stress your seeds and hinder growth.
Next time we talk, we’ll talk about other things I don’t like – called the determinant and indeterminant tomatoes. They have screwed me over many years in a row. So until next time, Sam, Sam Groff, from Beyond TP and Milk. Be sure to like, share, join our e-mail list, and start your seeds!
I’ve been watching a lot of my favorite YouTubers and they’ve been talking about the pros and cons of different types of pots, seed starting, and all those kinds of things. I realized they all have a way bigger budget than I do because they’ve been doing this for a lot longer and they have an income coming in from YouTube and all those kinds of things. I’m a hobby gardener, and still, I’m able to sustain food for my family. So what I wanted to look at is:
Let’s be reasonable about the average person, who might not have a whole lot of scratch lying around, who really wants to get started with seeds this year.
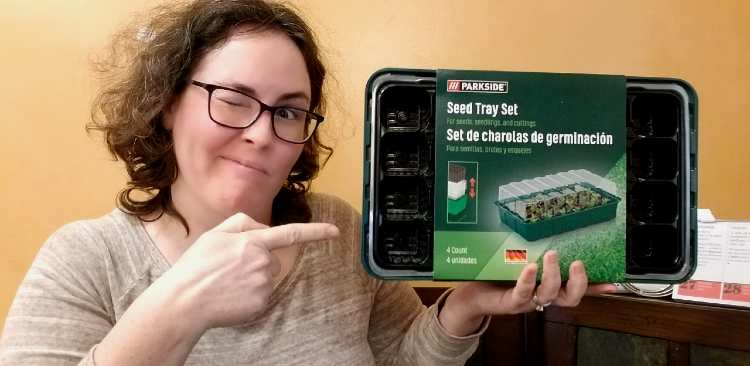
While shopping at Lidl’s today, I found these amazing trays. I thought they were going to be one-piece but in actuality, there are four – 4 full seed trays, full seed starters. The cost? $6.99 – for 4 full seed trays!
Each tray (4 in the pack) has 24 plugs plus the classic seed cover (for a greenhouse effect) and the water tray. So one pack will help you start as many as 96 plants! Let’s get going!
OOPS – no holes
So you can’t look a gift horse in the mouth, right! These trays are pretty inexpensive but no holes are in the separate plugs to allow for drainage. Instead of having to go buy hundreds of cell packs that I’m really never going to use, I decided that these would be better for us to start. And then what we’ll do is as they get larger, I’ll show you the way we transplant these in the Solo cups and then out into our garden. I don’t own grow lights. So I have a different method than what all the roles gardeners do.
Back to the holes:
I left the 4 packs of divider trays (for the plugs) together.
I had a hammer and a nail – a finishing nail.
I literally just went through them all together popped them out.
Now I have 24 holes in this lovely seed tray, ready to start filling.
Why do I tell you this? Because the reality is everybody who wants to start a garden worries about things going wrong and spending too much money. I don’t want to waste money. I can reuse these again next year if I don’t crush them, which is the goal. Plus the nice part about these is they come fully self-contained. They may not have a perfect seal, but they’ll be warm enough for the seeds to germinate.
Stay tuned, in another couple of episodes, I will show you what our method is without having grow lights and without having enough space in our house to really set up a true growing system. We do end up taking up a lot of room in our living room where we have the biggest amount of sunlight, but we do things a little differently mainly just because we don’t have space or the desire to get a grow light system in our house right now.
So if you’re ready, these super inexpensive plant trays. Look around your local grocery stores, your local Home Depot or Lowe’s. Try to get something small that you can maintain a manageable amount of your space.
And next time we will be planting our seeds. So until then, let’s do this.